Tere tulemast WordPressi. See on sinu esimene postitus. Võid seda muuta või kustutada, siis aga kirjuta ise!
Uus Medit i700 tuleb!
[blank h=”30″ hide_low_res=”” class=””]
[/blank]
[column width=”1/1″ last=”true” title=”” title_type=”single” animation=”none” implicit=”true”]

[/column]
[blank h=”30″ hide_low_res=”” class=””]
[/blank]
[column width=”1/1″ last=”true” title=”” title_type=”single” animation=”none” implicit=”true”]
Intraoraalse skanneri Medit i500 kasutajad üle maailma on olnud skanneri kasutamise ja tootja pidevate arendustöödega väga rahul. Skanneri hinnatase võrreldes seadme täpsuse ja kasutusmugavusega on olnud kiiduväärt. Seda enam ootame rõõmuga, mida toob meile uuenenud Medit!
Nüüd on saabunud hetk, kus saame teid kutsuda uue intraoraalse skanneri tutvustamisele – saabumas on uus MEDIT i700!
Registreeru juba täna uue MEDIT i700 veebiülekande üritusele aadressil:
MEDIT i700 ESITLUS
[/column]
[blank h="30" hide_low_res="" class=""]
[/blank]
[column width="1/1" last="true" title="undefined" title_type="undefined" animation="from-left" implicit="true"]
[slogan button_text="TELLI SIIT" link="https://old.biometricdental.ee/product/intraoraalne-skanner-medit-i500/" button_icon="theme-action-redo" button_icon_color="" button_icon_placement="right"]
Medit toob digitaalse hambaravi iga hambaravikliiniku käeulatusse.
[/slogan]
[/column]
[blank h=”30″ hide_low_res=”” class=””]
[/blank]
[blank h=”30″ hide_low_res=”” class=””]
[/blank]
Äripäeva raadios – digitaliseerimisest hambaravis
[blank h=”30″ hide_low_res=”” class=””]
[/blank]
[column width=”1/1″ last=”true” title=”” title_type=”single” animation=”none” implicit=”true”]

[/column]
[blank h=”30″ hide_low_res=”” class=””]
[/blank]
[column width=”1/1″ last=”true” title=”” title_type=”single” animation=”none” implicit=”true”]
Digitaliseerumine on võtmesõna maailma kõigis raviasutustel aina enam. Eesmärgiga hoida oma teenused tipptasemel ning pakkuda patsientidele maksimaalset ravi, tuleb ka hambaravi kliinikutel ja laboritel digitaliseerimisega sammu pidada.
Tehnika areng on toob patsiendile mugavama ravi, kuid ka arstide ja tehnikute jaoks annab see võimaluse hoida kokku aega ja raha ning pakkuda täpsemat ning efektiivsemat raviteenust.
Huvilistele pakume kuulata Äripäeva eetris olnud saadet, kus dr Timo Paberit Kreutzwaldi Hambakliinikust, dr Kertu Ollema Merimetsa Hambakliinikust ja Marko Lehes Biometric OÜ-st vestlevad hambaravitarkvara arendamisest ja Biometricu sünnist.
KUULA SAADET SIIT:
“Teerajajad hambaravi digitaliseerimises”
[/column]
[column parallax_bg=”disabled” parallax_bg_inertia=”-0.2″ extend=”disabled” background_color=”” background_image=”” background_repeat=”” background_position=”” background_size=”auto” background_attachment=”” hide_bg_lowres=”” background_video=”” extended_padding=”” vertical_padding_top=”0″ vertical_padding_bottom=”0″ horizontal_padding=”0″ more_link=”” more_text=”” left_border=”transparent” class=”” id=”” title=”” title_type=”single” animation=”none” width=”1/1″ last=”true”]
[/column]
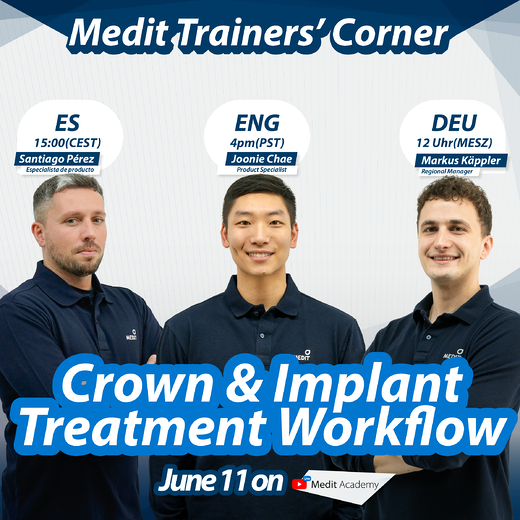
Welcome to the Medit Academy!
[column width=”1/1″ last=”true” title=”” title_type=”single” animation=”none” implicit=”true”]

[/column]
[column width=”1/1″ last=”true” title=”” title_type=”single” animation=”none” implicit=”true”]
This year we have become deeply committed to learning and practicing.
Luckily Medit Academy on YouTube has provided us with a number of excellent video study materials.
[/column]
[text_divider type=”single”]
MEDIT ACADEMY
[/text_divider]
[blank h=”30″ hide_low_res=”” class=””]
[/blank]
[column width=”1/1″ last=”true” title=”” title_type=”single” animation=”none” implicit=”true”]
We recommend to everyone who is interested in Medit Link and iScan, both before buying a Medit i500 scanner and
when starting to work with a scanner – Medit Academy and Medit Trainer’s Corner is your best way to go!
In the latest Medit Trainers’ Corner, we shared some tips on intraoral scanning specifically for crown & implant cases!
Take a look at the video by clicking the picture here below:
[/column]
[text_divider type=”single”]
[/text_divider]
[blank h=”30″ hide_low_res=”” class=””]
[/blank]
[column width=”1/1″ last=”true” title=”” title_type=”single” animation=”none” implicit=”true”]
All the product information about Medit i500 scanner, please find here:
[button id=”” style=”filled” class=”” align=”” link=”https://biometricdental.com/product/intra-oral-scanner-medit-i500/” linkTarget=”_blank” bgColor=”accent1″ hover_color=”accent1″ font=”24″ icon=”globe” icon_placement=”left” icon_color=””]PRODUCT INFO[/button]
[/column]
[blank h=”30″ hide_low_res=”” class=””]
[/blank]
[blank h=”30″ hide_low_res=”” class=””]
[/blank]
[column width=”1/1″ last=”true” title=”” title_type=”single” animation=”none” implicit=”true”]
[wpv_featured_products columns=”4″ per_page=”3″ orderby=”date” order=”desc”]
[/wpv_featured_products]
[/column]
Medit Link Workflow for Clinics: Ordering from Labs
[column width=”1/1″ last=”true” title=”” title_type=”single” animation=”none” implicit=”true”]

In this article, we are looking at the Medit Link workflow from the clinic side. Read on to find out just how easy it is to scan and send your cases to the lab of your choice via our integrated platform.
So, let’s start by first creating a case and scanning! Make sure that your i500 is connected and switched on before proceeding. Create a new case in Case Box and click on the Scan button to launch the iScan application and begin scanning.
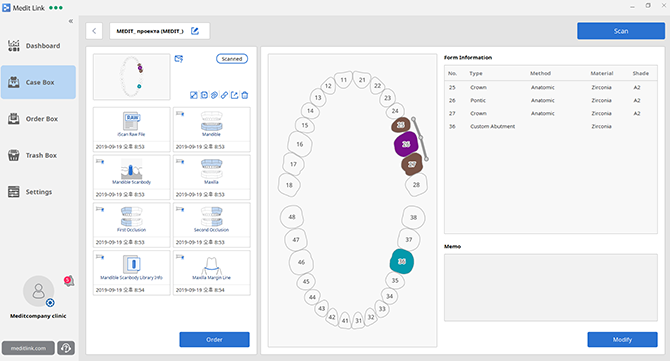
After completing all the scan stages, iScan will prompt you to pick one of three options to fill the holes for the data results. The results will be displayed in your Case Box where you can do a final check. You can still modify, add scans or rescan for the case until you are satisfied with the scan data. You are now ready to order your dental prostheses from the lab!

Before you can begin sending your case to the lab, you will need to first search for the lab to set up a partnership with. Type in the lab’s name in the search bar, click on the “Request Partnership” button, and wait for your new partner to accept your request. Once the lab accepts your request, you will both be listed as partners on your respective accounts, and you can begin to send your orders to the lab.

Now, let’s walk through how to send a case to the lab! Head over to your Case Box and click on the case which you’d like to make an order for. If you’d like to make multiple orders for a case, duplicate the case before making the order as you can only make one order per case. In the Case Details page, click the Order button and fill in the Order Case form accordingly. Click OK and head to the Order Box to check that the order has been listed. The order will be reflected as Pending until the lab accepts the order.

You can review all the orders you have sent here in the Order Box and view order details by clicking on the case. Once the lab has accepted your order, your order status will be reflected as Accepted. You can await your order to be delivered once the status is reflected as Shipped. Make sure to click Confirm Delivery once you receive your order from the lab to complete the case. That’s the entire workflow sans payment!
Want to simplify the workflow a little more? Set up a contract with your partner lab in order to facilitate payment via Medit Link. Make sure to check the lab’s terms & conditions and price list before requesting for a contract! If you’re agreeable to the terms and the pricing, click Request Contract to proceed. Once that is done, your partner lab will receive your request for a contract. If the lab accepts your request, you will be able to make payments as well as manage your payment history via Medit Link.
That’s all you need to know about the digital workflow on Medit Link.
It’s now time to get your own MEDIT i500 intraoral scanner!
[/column]
[blank h=”30″ hide_low_res=”” class=””]
[/blank]
[column width=”1/1″ last=”true” title=”” title_type=”single” animation=”none” implicit=”true”]
[button id=”” style=”filled” class=”” align=”” link=”https://biometricdental.com/contact-us/” linkTarget=”_self” bgColor=”accent1″ hover_color=”accent1″ font=”24″ icon=”redo1″ icon_placement=”left” icon_color=””]CONTACT US[/button]
[/column]
[blank h=”30″ hide_low_res=”” class=””]
[/blank]
[blank h=”30″ hide_low_res=”” class=””]
[/blank]
[column width=”1/1″ last=”true” title=”” title_type=”single” animation=”none” implicit=”true”]
[wpv_featured_products columns=”4″ per_page=”3″ orderby=”date” order=”desc”]
[/wpv_featured_products]
[/column]
[blank h=”30″ hide_low_res=”” class=””]
[/blank]
Dental Lab CAD/CAM engineer on Why You Should Go Digital?
[column width=”1/1″ last=”true” title=”” title_type=”single” animation=”none” implicit=”true”]

MEDIT i500 intraoral scanner for dental clinics
[/column]
[blank h=”30″ hide_low_res=”” class=””]
[/blank]
[column width=”1/1″ last=”true” title=”” title_type=”single” animation=”none” implicit=”true”]

CAD / CAM engineer Erkki Ernits
Kreutzwald Dental Laboratory
Erkki has a Master’s degree from Tallinn University of Technology and has worked in the ICT field for more than 10 years. In recent years, he has completed several courses on mechanical engineering and computer-aided design.
Erkki has helped to set up fully digital workflow for Kreutzwaldi Dental Lab in collaboration with Merimetsa Dental Clinic and Kreutzwaldi Dental Clinic and is working as a CAD/CAM lab engineer. His knowledge covers both lab hardware and software and finding solutions even for the most difficult cases.
[/column]
[blank h=”30″ hide_low_res=”” class=””]
[/blank]
[column width=”1/1″ last=”true” title=”” title_type=”single” animation=”none” implicit=”true”]
I prefer a digital intraoral scan data for 3 main reasons:
1. TIME SAVING
All the communication and digital data sharing is easy and quick. I can start working as soon as the digital intraoral scan data reaches the laboratory. The time savings are even greater regarding implant work, as the digital impression is taken directly from the mouth with the scan body. Compared to a regular model, you no longer have to spend time with an analogue and later scanning the model with a scan body.
2. ACCURACY
The digital impressions are very accurate and I don’t have to worry about whether the model is correct or not.
3. NO LACK OF SPACE
This means that there is no need for a separate storage room for storing models. However, all digital data will be there if necessary and can be used several times.
[/column]
[blank h=”30″ hide_low_res=”” class=””]
[/blank]
[column width=”1/1″ last=”true” title=”” title_type=”single” animation=”none” implicit=”true”]
Are your clinic interested in MEDIT i500 scanner presentation?
Do contact us via e-mail or phone to get the best offer and easily manageable payment plan made specially for you.
[/column]
[blank h=”30″ hide_low_res=”” class=””]
[/blank]
[column width=”1/1″ last=”true” title=”” title_type=”single” animation=”none” implicit=”true”]
[button id=”” style=”filled” class=”” align=”” link=”https://biometricdental.com/contact-us/” linkTarget=”_self” bgColor=”accent1″ hover_color=”accent1″ font=”24″ icon=”redo1″ icon_placement=”left” icon_color=””]CONTACT US[/button]
[/column]
[blank h=”30″ hide_low_res=”” class=””]
[/blank]
[blank h=”30″ hide_low_res=”” class=””]
[/blank]
[column width=”1/1″ last=”true” title=”” title_type=”single” animation=”none” implicit=”true”]
[wpv_featured_products columns=”3″ per_page=”3″ orderby=”date” order=”desc”]
[/wpv_featured_products]
[/column]
[blank h=”30″ hide_low_res=”” class=””]
[/blank]
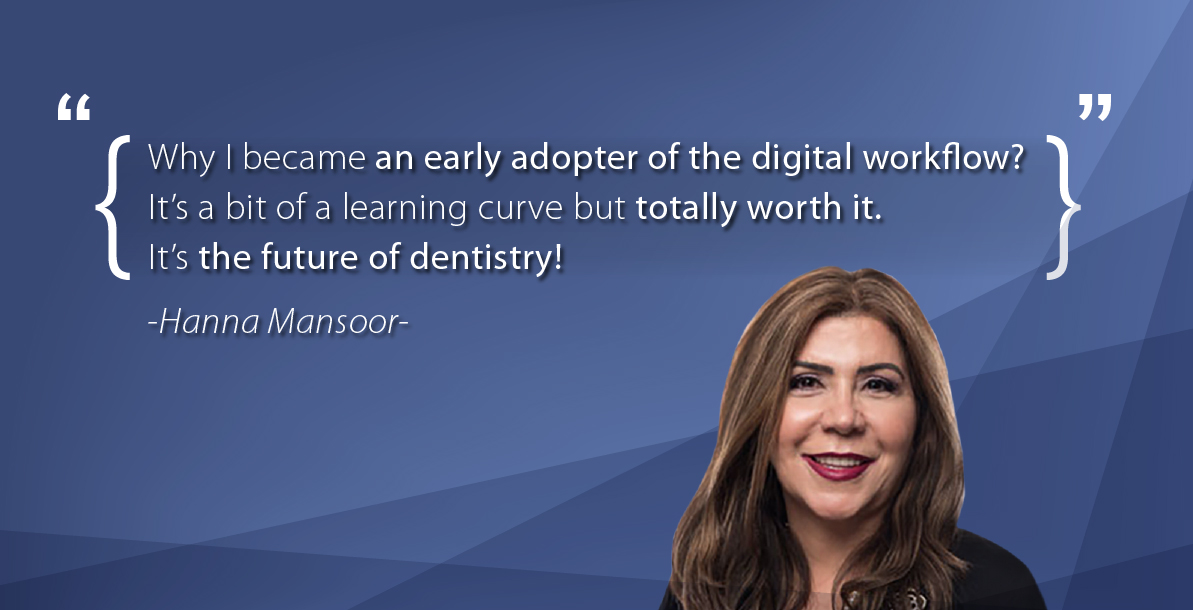
“Why I became an early adopter of the digital workflow?”
[column width=”1/1″ last=”true” title=”” title_type=”single” animation=”none” implicit=”true”]
Dr. Hanna Mansoor is a dentist and clinic owner from Arizona who has made the switch to digital dentistry a while ago. Medit sat down for an interview with her to find out how general dentists can benefit from incorporating the digital workflow, as well as what advantages are there with regard to patient care, specific applications, and overall case management.
Earlier this year you were on the cover of Dental Product Shopper as an early adopter of the Medit i500 intraoral scanner. How did you transition into digital dentistry?
I was looking for a scanner that was fast, easy to use and able to capture all the necessary details. I wanted a system which provides great accuracy, and a user-friendly accompanying software which would allow for fuss-free exports. So, I evaluated the different options before deciding which one would be best for my clinic.
How has your practice profited from making the switch to a digital workflow?
With the proper technique, scans are very fast, so they really help us to save time. We have also been able to reduce our expenses because we don’t need to purchase materials otherwise necessary for traditional impressions when using the digital method.
In addition, retakes have been reduced drastically. With digital impressions you can always zoom in and check the details. If there is any distortion due to blood, saliva, or soft tissue, you can reverse steps or delete parts of a scan without having to repeat the entire scanning process.
Aside from the scanner, we are also using the Medit Link software in order to manage our workflow and orders. Once a scan is completed it is uploaded onto the integrated cloud storage of the platform. This is very convenient as it allows us to scan cases directly to our labs for all use cases, including full-arch scans for clear aligners or implant surgical guides.
You began your career in dentistry as a dental hygienist, so you must understand the importance of connecting with patients in order to make them feel comfortable and reduce their nervousness and tension. In what ways do you find that intraoral scanning has supported this?
Our patients are often impressed by the technology. It is pain-free, and we can visually communicate their cases to them easily. Intraoral scanning is simply more comfortable for patients, especially for those with a strong gag reflex. Classic impression methods are often the cause for discomfort. The i500 in particular has a small, round tip and the wand is easy to maneuver, which further guarantees patient comfort.
Has there been an interesting case recently with regard to intraoral scanning that you would like to share with us?
Lately we have been using it to scan full arches for clear aligner cases and creating surgical guides for implant placement. We have also been working with digital smile design software a lot recently to design and fabricate a digital smile from my digital scans and create a mock-up of the patient’s ideal smile according to his lips and other muscle structures which allows us to give the patient a beautiful natural smile.
What would you like to tell dentists and clinics that are still hesitating to make the transition into digital dentistry?
Just do it! It’s a bit of a learning curve but totally worth it. It’s the future of dentistry!
We would like to thank Dr. Mansoor for taking the time to share her experience and expertise. If you want to learn more about the Medit i500 and Medit Link, visit our product pages!
[button id=”” style=”filled” class=”” align=”” link=”https://biometricdental.com/product/intra-oral-scanner-medit-i500/” linkTarget=”_self” bgColor=”accent1″ hover_color=”accent1″ font=”24″ icon=”medal” icon_placement=”left” icon_color=””]GET YOUR MEDIT i500[/button]
[/column]
[divider type=”1″]
[/divider]
[column width=”1/1″ last=”true” title=”” title_type=”single” animation=”none” implicit=”true”]
About Dr. Hannah Mansoor
Dr. Mansoor is the owner of the practice Smiles by Hanna and focuses on conservative holistic dentistry as well as specialized services such as implants, lasers, digital smile designs and sleep dentistry. She is a graduate of the University of Detroit Mercy School of Dentistry, a Fellow of the Academy of General Dentistry, a Master of the International Congress of Oral Implantologists and Implants Masters from giDe institute. She is a member of the ADA, Pierre Fauchard Academy, and the Arizona Dental Association.
[/column]
4 Key Considerations for a Modelless Workflow
[column width=”1/1″ last=”true” title=”” title_type=”single” animation=”none” implicit=”true”]
You may have read about the benefits of a model-less workflow such as better cost efficiency and better production quality and your dental practice or laboratory may be looking into adopting this digital workflow. But before you do that, here are some key considerations to take note of so you know what you’re going into, and to make the switch a more seamless one.
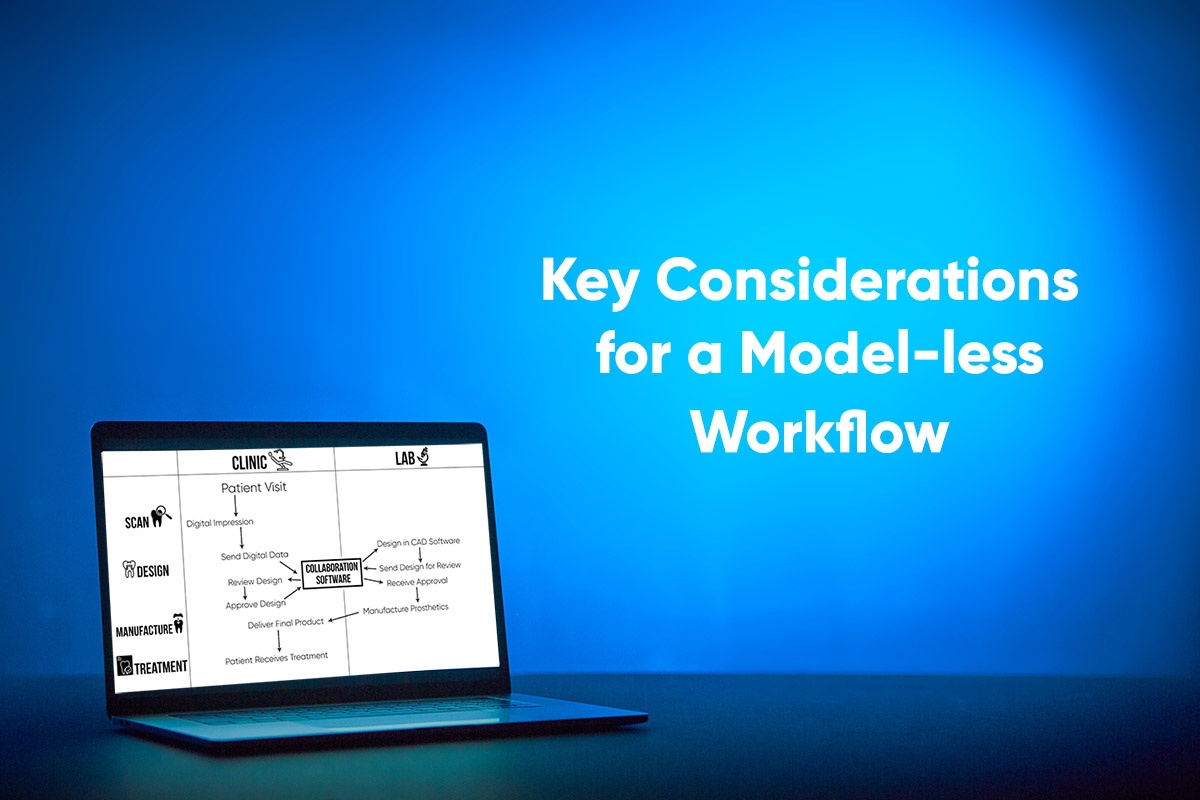
First of all, let’s go through the whole process of a model-less workflow step-by-step, as illustrated by the diagram below.
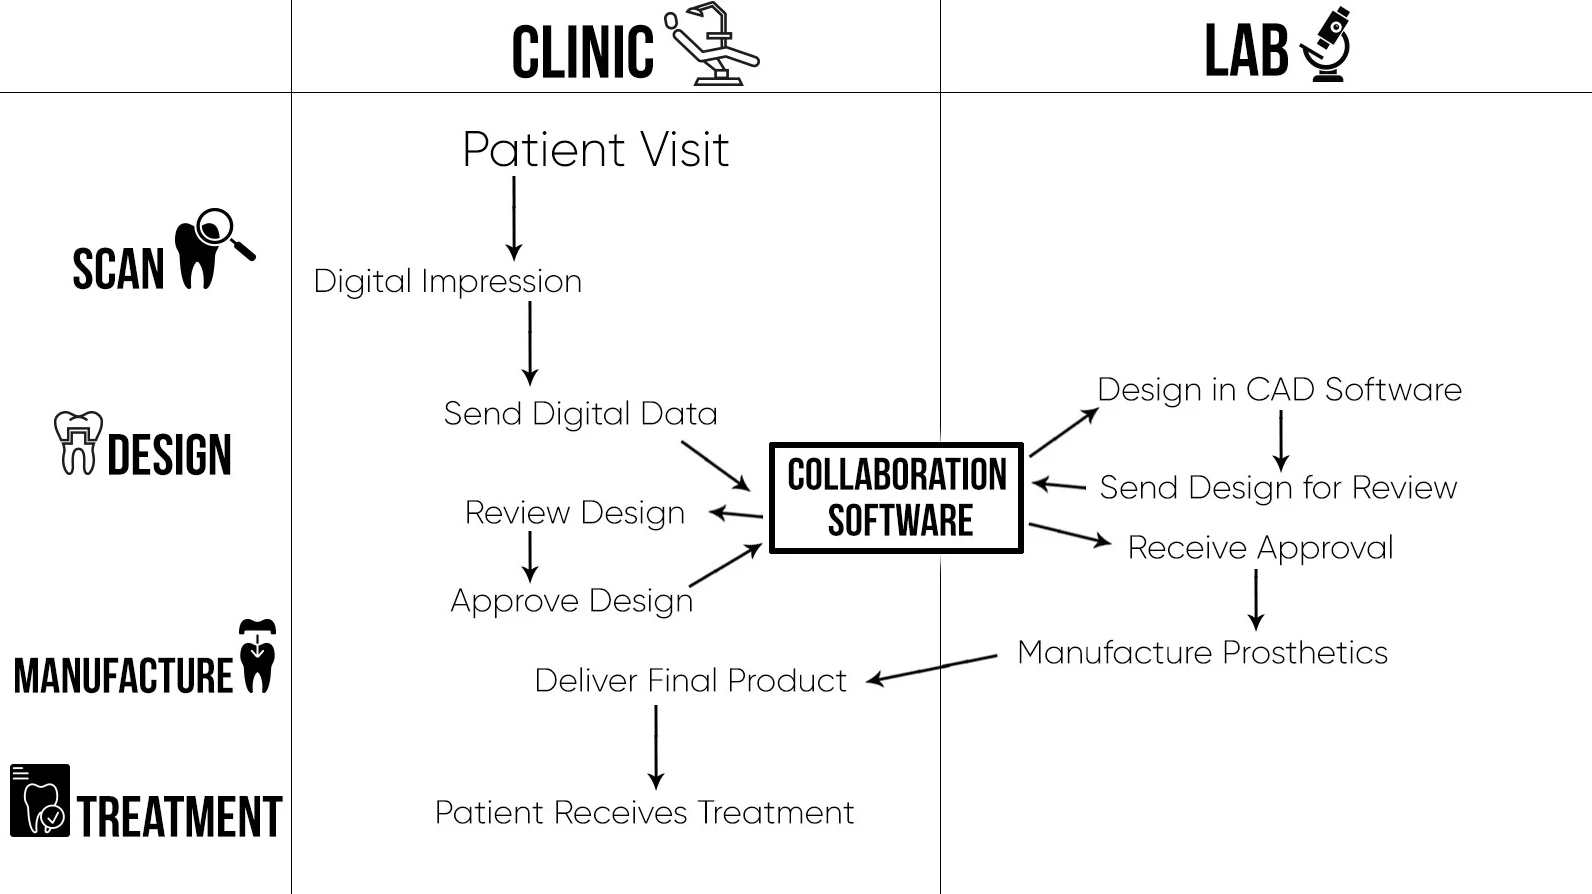
Digital Diagram
Removing the need for gypsum models saves both the clinic and lab a significant amount of time. This allows you to examine impressions quickly to identify possible errors in scanning before going into fabrication, hence increasing the quality of the resulting prosthetics. Doesn’t that sound great? But before you get right into it, here are some things to take note of!
1. Deciding on the product(s) to purchase
It is important to do in-depth research before deciding on a product, including ROI calculations. This is to ensure that your purchase will be an asset rather than a liability for your practice. Besides monetary profits, you should also consider intangible benefits when calculating the ROI such as offering better services to your patients or your clients. After making sure that this is a sound investment for your practice, you can look at studies which compare the various technology and products available in the market so you can make a more informed decision.
Now that you’ve decided to take that leap, the next step is actually implementing it.
2. Making the transition
Any transition requires adjustment time. Lab technicians may initially are on the fence about not having a model as a point of reference while dentists will need to learn how to take digital impressions. To ease into the new workflow, labs can use a milled or printed model while tweaking the design parameters to make sure their clinic partners are comfortable with the fit of the restorations before moving into a completely model-less workflow. It is important to note that the key to a successful transition requires close communication with your partner(s). Make sure to go over the first few cases thoroughly and address any concerns about the change to ensure that they are onboard with the transition.
This brings us to our next point.
3. Choosing a system
There is a wide variety of technology in the market so how do you know which suits your needs best? The most important thing to take note of here is that there are closed-systems which do not allow you to work with any components manufactured by another company. This means that if you decide on a closed-system, you will only be able to work with partners who are using the same system. To maximize the number of partners you can work with, labs can choose to invest in more than one CAD software package, pay a one-time or annual fee to access a system’s files, or use an open system where possible. The second option is certainly the more cost-friendly and flexible choice.
4. Making sure the end result fits
Finally, it is important to make sure that the resulting prosthetics from a model-less workflow actually fits. The biggest factor affecting the fit of a prosthetics is the digital impression itself, making the quality of the scan especially crucial in a model-less workflow. This means that lab technicians need to be trained to spot errors or inaccuracies in digital impressions so that the issues can be rectified before proceeding to the manufacturing stage. Again, this means that communication between the clinic and the lab is important for the success of the model-less workflow. Additionally, choosing a scanner that guarantees a high level of accuracy and quality scan data is crucial as well.
If you’re looking for an open system for your model-less workflow, check out Medit Link, Medit collaboration tool for dental clinics and labs.
[/column]
New iScan Function: Smart Scan Filtering
[column width=”1/1″ last=”true” title=”” title_type=”single” animation=”none” implicit=”true”]
[/column]
[column width=”1/1″ last=”true” title=”” title_type=”single” animation=”none” implicit=”true”]
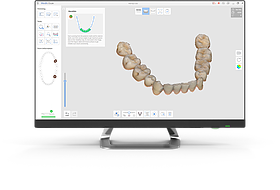
Have you ever wished that your intraoral scanner could do more of the work for you? Well, with iScan V1.4, your software can help you to remove unnecessary scan data as you are scanning, with Smart Scan Filtering! Find out what each option does and when to use the different options for the best scanning experience.
What exactly is Smart Scan Filtering? Before we dive into it, we’d like to make a disclaimer. This is a function which you can use only if your system has a graphics card with at least 6GB of dedicated memory. Otherwise, you may have issues trying to activate the filter options. Do remember to check before activating the filter options (Settings -> Use GPU ON)!

Smart Scan Filtering Options
So, you have activated the smart scan filtering options. What do the three icons mean and what do they filter exactly? Let’s go through each option briefly!
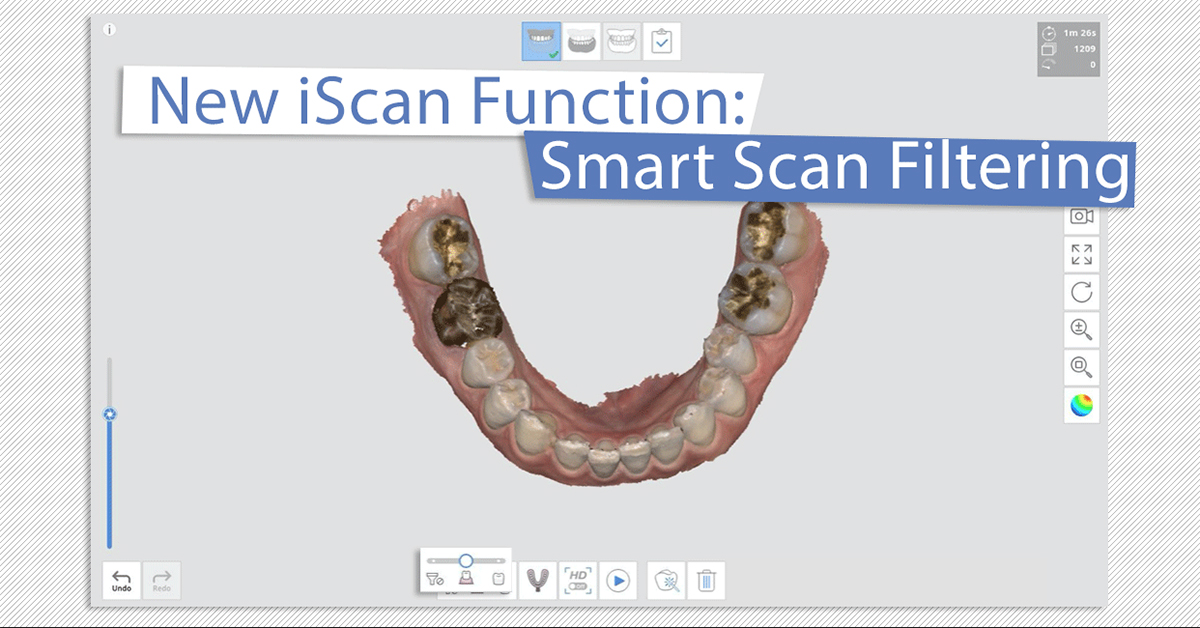
The first icon on the left is the “no filter” option, meaning that soft tissues will not be filtered. You can use this option when scanning edentulous cases, stone models or other dental models.

Scan Data Using Smart Scan Filtering Option 1: No Filter
The second icon in the middle is the “teeth & gingiva” option which filters soft tissue that interferes with scan data, leaving only the necessary gingiva data. We recommend this option for general scan cases, so this would probably be the option you will use most.

Scan Data Using Smart Scan Filtering Option 2: Teeth & Gingiva
The last icon on the right is the “teeth” option which, as you may guess by now, filters everything else besides teeth data. Why would you want to scan only the teeth data, you may ask. The purpose of this filter option is more for additional scans, for when you need slightly more data of the teeth after scanning with the second filter option. We don’t recommend using this filter option for your base scan data!

Scan Data Using Smart Scan Filtering Option 3: Teeth
You can see the differences in the same scan subject, using the different filtering options, in the photos above.
Want to see the different filtering options in action? Check out our tutorial video!
https://www.youtube.com/watch?v=qA85EeF0k4c&feature=emb_logo
More related articles on Medit blog
[/column]
Medit Link V2.2 & iScan V1.4
[column width=”1/1″ last=”true” title=”” title_type=”single” animation=”none” implicit=”true”]
[/column]
[column width=”1/1″ last=”true” title=”” title_type=”single” animation=”none” implicit=”true”]
Experience New Workflows with Our Partner Integrations
As a platform, Medit Link partners with various global solution providers who share the same idea of growth through openness. Together, we strive to bring our users new workflows that define the future of digital dentistry.
Try out New Functions via App Box Extensions
Introducing the App Box – a new feature which allows you to install available extensions in Medit Link. In addition to having the flexibility of choosing your own workflows with partner software, the App Box will also include add-on features for clinics.
Better Communication with Your Patients: Case Talk
In order to facilitate smoother communication, we have introduced a new Case Talk menu so you can have conversations with your patients, anytime. All data is stored securely, with the use of PIN and QR codes, so you don’t need to worry about your data being compromised.
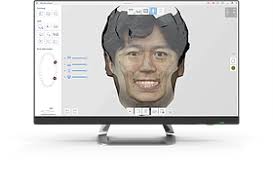
New Feature on iScan: Face Scan
You can now scan your face with the i500 via Medit iScan! In addition, you can also import 3D face data and bone data and align the various data sets for a more comprehensive final result.
Capture Only the Data You Want to Keep: Smart Scan Filtering
We know the challenge and frustrations of capturing unnecessary soft tissue data while scanning. Ease your worries! With the smart scan filtering feature, you get to decide how much soft tissue data you’d like to capture while scanning, allowing you to choose the best option for each case.
Customize Your Scanning Workflow: Switching the Order of the Scan Stages
Do you prefer to scan the maxilla first before the mandible? Or the other way around? Whichever your preference, you now have the flexibility to choose the order of the scan stages to suit your working style and needs!
Medit Link V2.2 Release Notes
New Features -Web
The Medit Link homepage (meditlink.com) has been refreshed.
A new service landing page with information about the contents of the Medit Link service has been launched.
Membership service will be launched in the second half of 2020.
‘My Membership’ menu has been added for users to view their membership information.
The cloud storage capacity and other advanced features are offered based on the user’s membership plan.
A new patient consultation feature ‘Case Talk’ has been added.
This patient consultation tool is available only for Clinic accounts and can be managed under the ‘Case Talk’ menu.
A list of all the cases created in the app, as well as scan data, can be found in the menu.
Communication with patients is possible by sharing a link to the Web Viewer via email or SMS.
My Information > Group Information: Users can check the record of members who have joined and left the group.
New Features – App
A button for Face Scan has been added to the form information window for the face scanning feature in iScan.
Face Scan files can be managed and used for orders in Medit Link.
The images captured in iScan can be edited using the Medit Link paint tool and can also be used when making orders.
The App Box has been added.
We have cooperated with Software Development Partners and Solution Providers to be integrated with Medit Link. You can install the available extension programs via App Box to complete the integration.
Experience a greater variety of workflows with the installed apps.
We will continue to add more apps in the App Box.
A banner space has been added at the top of the App Box page for partner introductions.
If you select exocad in the “Set Export Option” window, Medit Link will automatically create a compatible results file.
The raw scan files that were not uploaded can be reviewed and uploaded individually or in bulk.
The save path can be set to the local network drive.
However, the network drive will not be available in offline mode.
All users in the group can now be notified when a case has been completely processed.
Improvements
The UI of the Case Detail page has been improved.
Case history can be reviewed.
Case files can be viewed in the form of a list.
The transfer status of the file is shown by a progress bar with percentage display.
The 3D preview image has been improved by making the toolbar smaller so that the user can better focus on the image.
The support request window has been improved. Users can now choose the request type and select files to attach with the support request.
Available extension types to preview the attached files in have been added.
2D Image: png, jpg, jpeg, bmp, gif, tif, tiff
Video: mkv, mp4, avi, wmv
A button has been added to allow users to check the notices as well as to update details in ‘My Information’ window.
Previously, when a lab did not enter the shipping information, the cases in the order box could not be marked as complete because there was no delivery. The user can now change the status of these cases manually. This feature is not available in the In Box.
The names of the users who have deleted cases are now shown in the Trash Box.
Users can select the folder (save path) and input file name when exporting from Medit Link.
Bug Fixes
The following issues have been fixed:
Incorrect alignment of design file and scan results in the preview window.
Intermittent failure when synchronizing raw scan file.
Intermittent failure when importing files using the Case Converting Tool.
Partnership status being terminated without any restrictions.
Medit iScan V1.4 Release Notes
Improvement of UI/UX
The user interface is designed to be simpler and is categorized for the convenience of users.
Icon size has been reduced to make more space for the scan data.
If the scan stage meets the requirements, a check icon will be displayed to let the user know which stages are complete.
Tools that can be used only for the occlusion have been moved to the ‘Occlusion Scan Stage’.
‘Smart Data Cleaning’ which is related to data editing has been moved to the ‘Trim’ section.
‘Tools’ have been repositioned according to their functions.
The ‘Model Display Mode’ has been moved to the right-side bar – the touch screen controls are set to resemble a smartphone touch screen controls, and the ‘Pan’, ‘Zoom In/Out’, ‘Zoom Fit’ icons have been removed. They can be restored under settings.
The application can be used with a touch screen on the PC. For users running it on a laptop, trackpad keyboard controls have also been added.
Improvements in reliability map and post-processing algorithm have been made. The window which appears after the user clicks ‘Done’ previously showed three options for the 3D model. This has been simplified to two options for the convenience of users. You can also check the important conditions here before post-processing.
Smart Scan Filtering
This feature removes unnecessary soft tissue data which is the biggest challenge while scanning. Three filter options are available.
No Filtering
The previous basic filters (1,2,3) have been optimized and this filter is similar to the level one filter from the previous version. This is the basic filtering level and does not filter unwanted tissue. This option is useful for edentulous arch or plaster model cases.
Teeth + Gingiva
This filter removes soft tissue that interferes with the scan, leaving only the necessary gingiva. You can use this option for most general scan cases.
Teeth
This filter scans only the teeth. This option is effective for when you want to scan only the teeth as an additional scan, after scanning using the ‘Teeth + Gingiva’ filter.
Face Scan
You can scan your face with the i500, and also import 3D face data (STL, OBJ, PLY) and bone data (STL, OBJ, PLY) from an external source which have been converted from DICOM files taken via CT. The compatible data pairs can be aligned.
Measure
The ‘Measure’ tool allows you to measure the distance, angle, length, area, etc. of the 3D scanned data or section lines in iScan to check the progress of teeth preparation, height of the occlusion, as well as length of the teeth. The deviation result of two data sets can also be checked via the color map.
Reorder Scan Stages
Users can change the order of the scan stages.
Reposition Scan Data on The Occlusion Plane of Articulator
The scanned data is placed on the occlusion plane so that you can manually reposition it in case of incorrect positioning. In addition to that, the aligned result can be made compatible with the virtual articulator in exocad.
Improvement of A.I. Abutment Matching
You can save the margin line for abutments in the A.I. Abutment Matching dialog box. After you register the margin line, you can skip the process of drawing the margin line for each case in the dental clinic or lab. This saves a lot of time and unnecessary processing.
After the registered abutment is imported, the height is adjusted automatically or manually according to the scanned abutment. In this way, the saved abutments can be used for various cases.
Change Occlusion Target
Previously, occlusion alignment was only possible by using the maxilla and the mandible scan data in the ‘Scan Occlusion’ stage. Now, you can also use the pre-operation maxilla and the pre-operation mandible scan data.
Overview Stage
The ‘Overview’ feature has been added where you can view all the data simultaneously when you are not in any scan stage. Click the icon on the tree view on the left to hide or show each data set and use the slider to adjust the transparency.
Improvement of Replay
The ‘Scan Replay’ has been improved with options to choose scan steps. This helps the user view the scan replay video step-by-step.
Improvement of Post Processing Performance
Alignment of scan data is much more accurate in comparison to previous versions, resulting in better results with a smaller file size. Post-processing time has been reduced by about 20%.
Screen Capture
A screen capture feature and its corresponding tools have been added to the top right of the application window.
Improvement in Reliability Map
More conditions have been added to the Reliability Map for higher accuracy as compared to previous versions.
For users having difficulty in differentiating red and green colors, you can replace the green color with blue for the reliability map. Go to settings and ‘Reliability Map Color Mode’ to set the color.
Suitable Temperature for Calibration
The data accuracy increases if the temperature of the i500 during calibration is similar to the temperature while scanning.
The added feature to heat the device can be used in cases where the temperature of the i500 right before calibration is low.
Color Adjustment of Color Scan Data
The color processing algorithm and model rendering has been improved to display the scan data in a more natural way with more texture detail.
Changes and Improvement in ‘Settings’
The previously separate options have now been combined into single options of ‘Show Scanning Information’ and ‘Start Automatic Scan’.
The option to ‘Always scan in HD mode’ has been added for users who always scan in HD.
An option for the notification of external light detection (Beta) has been added. A strong light shining on the dentist chair can immensely affect the scan data, especially the anterior teeth data.
You can choose to display either three or six icons on the right side for ‘Model Control’.
The features ‘Use GPU’ and ‘Remove Soft Tissues’ have been removed as beta features and added as regular features. While using the GPU, a feature to check the basic specifications has been added and a message is displayed for each condition.
‘File Size’ and ‘Surface Roughness’ from the ‘Complete’ dialog box have been moved to the settings menu.
Improvement in Guide Messages
Guide messages for the user have been added and improved to make our product more user-friendly.
The user cannot get the best performance if the laptop power cable is not connected. A guide message is displayed in this case.
The scan strategy images and corresponding explanations have been improved so that the user can scan easily and correctly.
An ‘Overview’ has been added for the 3D model to help users operate the model conveniently.
Overall Improvements
Improved manual alignment in every step and a unified UI/UX.
Improved color bar algorithm in each stage to add the maximum and minimum value of deviation in extra boxes for calculation and to modify the maximum and minimum values on the color bar. Additionally, resolution control has been added to all the color bars to unify the UI/UX.
Improved algorithm for ‘Global Soft Tissue Filtering’ to prevent the tooth area from being deleted. It is no longer a beta version and has been changed to a regular feature.
Improved algorithm for ‘Scan Depth’, and the suitable filter values for each scan depth, are now automatically applied. It will automatically adjust to capture most of the data even when using deep scan depths, helping to scan deep areas without filtering out the necessary data.
Improved algorithm for ‘Scan Speed’ to calculate and display the scan speed more accurately than previous versions.
Improved ‘HD Camera’ algorithm to avoid shaky pictures taken with the i500 device. When you press the button, the camera automatically detects when there is minimum movement and maximum stability.
Improved saving algorithm for safe and secure storage of data.
More related articles on Medit blog
[/column]