Gypsumless Digital Workflow by Ko Dong Hwan

[column parallax_bg=”disabled” parallax_bg_inertia=”-0.2″ extend=”disabled” background_color=”” background_image=”” background_repeat=”” background_position=”” background_size=”auto” background_attachment=”” hide_bg_lowres=”” background_video=”” extended_padding=”” vertical_padding_top=”0″ vertical_padding_bottom=”0″ horizontal_padding=”0″ more_link=”” more_text=”” left_border=”transparent” class=”” id=”” title=”” title_type=”single” animation=”none” width=”1/1″ last=”true”]

[column_1 width=”1/1″ last=”true” title=”” title_type=”single” animation=”none” implicit=”true”]

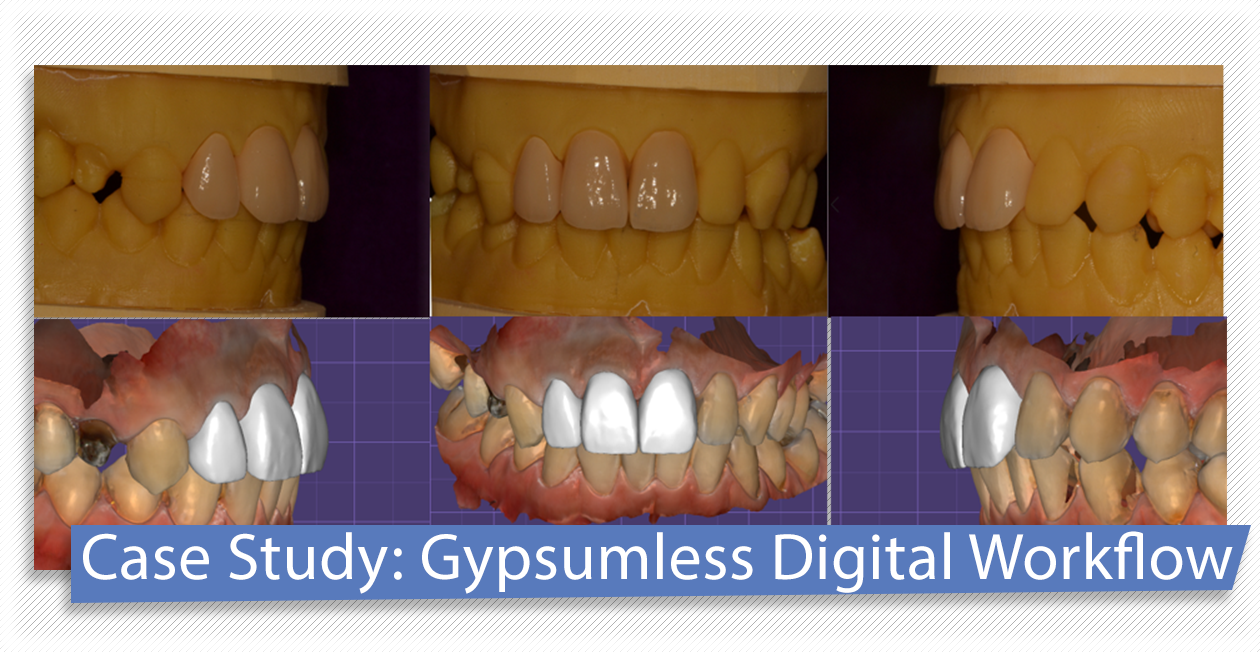
Ko Donghwan, Director of D-Lab and Medit Link power user, he shares with us a case he worked on using Medit i500 scan data. This is a “Gypsumless digital workflow” case done in collaboration with Dr. Kim Jong-yup, Director of Boston Smart Dental Private Practice.

The following is the case study shared by Ko, in his own words.


Prosthetic fabrication using intraoral scan data is becoming increasingly more accurate as the stability of scan data improves. If you have a 3D printer, you can print models at any time, allowing you to experiment with making more diverse digital prostheses.

This case is an anterior 3-unit case using i500 scan data. I will now introduce how to manufacture a build-up crown using a 3D printed model, as well as how to use reference lines to improve the aesthetics.

KoDongHwan-1

Proximal caries were made for the purpose of improving the tooth shape and dentition of patients with severe incisor cases. Firstly, the treatment for the three teeth 12, 11, and 21 is carried out, and the arch and shape of the teeth are adjusted to the patient’s oral cavity using temporary teeth.

KoDongHwan-2

In the clinic, the dentist scans using the i500 and made reference lines for dental arrangement using the Generic visualization function, one of the add-on mesh functions in exocad. (mid-line, occlusal plane, frontal plane)

KoDongHwan-3

Design the entire shape based on the provisional restoration data and the reference lines. You can see that the frontal direction of tooth number 21 is slightly different from the temporary tooth.

KoDongHwan-4

For porcelain build up, perform a digital cutback and print out the 3D model. I didn’t create a model for the separation of the abutments. However, if necessary, I would print just the abutment teeth separately to check the fit.

KoDongHwan-5

We printed the full contour temporary with the model, which is the basis for the shape of the teeth, the space between each tooth etc. at the time of the build-up. Once the processed coping matches the model, the preparation for the build-up is done.

KoDongHwan-6

Build up and finish contouring in line with the planned design. There are printed temporary teeth that can be referenced during manufacturing.

KoDongHwan-7

Build up crowns made with intraoral scan data must be accompanied by a printed model. Using a 3D printed model has several advantages over using a gypsum model.

  1. 3D printed models can be re-printed at any time, making it more convenient and efficient in comparison with the gypsum model, which is difficult to re-create if damaged.
  2. Without the use of plaster, the work environment becomes more hygienic, cleaner and safer for employees.
  3. You can work on a greater variety of prostheses using digital data.

This case was made in collaboration with Dr. Kim Jong-yup, Director of Boston Smart Dental Private Practice. You can check more detailed work processes from scans to prosthetics on his YouTube channel.

More related articles on Medit blog

[/column_1]

[/column]

Interview: Orthodontist Dr. Vas Srinivasan on the Switch to Digital

[column parallax_bg=”disabled” parallax_bg_inertia=”-0.2″ extend=”disabled” background_color=”” background_image=”” background_repeat=”” background_position=”” background_size=”auto” background_attachment=”” hide_bg_lowres=”false” background_video=”” extended_padding=”false” vertical_padding_top=”0″ vertical_padding_bottom=”0″ horizontal_padding=”0″ more_link=”” more_text=”” left_border=”transparent” class=”” id=”” title=”” title_type=”single” animation=”none” width=”1/1″ last=”true”]

[column_1 width=”1/1″ last=”true” title=”” title_type=”single” animation=”none” implicit=”true”]

Dr. Vas Srinivasan is an experienced orthodontist from Australia who recently tested the Medit i500 intraoral scanner for orthodontic use cases and supported the scanner validation for the Spark aligner workflow. We took this opportunity to talk to him in order to find out how intraoral scanning benefits his work, and what advice he would give to fellow orthodontists who are considering making the switch to digital impressions.

Could you please tell us a little bit about your dental background, field of expertise, and clinic?

Sure! I am an orthodontist and I would say that I have a lot of passion for my work. As a teenager, I wore braces which, combined with my interest in science and mathematics, laid the base for choosing a career in orthodontics. So eventually, I graduated with a Master’s degree from the University of St. Thomas in Minnesota, USA, and completed my orthodontic training at the University of Sydney, Australia. Today, I own three practices and have been in clinical practice for 7 years.

As an orthodontist, how challenging was it to transition to digital dentistry?

I am not going to lie; digital dentistry can be overwhelming at first. Initial setup costs may appear high and you will need to rely on other professionals like IT or operations managers. Most importantly, you need to believe in it in order to succeed. However, I believe it is completely worth taking the leap.

So, how would you say the patient experience has changed thanks to digital impressions?

I wish we had marketed our digital presence better than we did. We continue to have patients who are constantly worried about the “moulds” they require. When you show them a 3D scanner, their perception changes immediately.

What would you consider the biggest advantages for orthodontists with regard to intraoral scanning?

3D scanning has many advantages, one of them being delegation. Secondly would be the speed and accuracy of digital impressions. A key point, however, is that you are investing in technology for a better patient experience which in return will be a great benefit for your clinic in general.

You have tested the Medit i500 for orthodontic cases. How has your experience been so far, and would you recommend the scanner for this field?

We loved our interaction with the entire Medit team! They were fast, efficient and unbelievably quick to interact and respond. Every scanner has a small learning curve, but the Medit i500 performed very well even when we did our first ever scan with the device.

Has there recently been any memorable case for which using the i500 has been especially beneficial?

Certainly! A patient with a large tongue came in the other day. The other scanners’ heads are very bulky, but Medit performed the scan so efficiently thanks to its small tip size, I was very impressed.

Finally, is there any advice you would like to give fellow orthodontists who are considering making the transition to digital impressions and who may be looking for a suitable intraoral scanner?

I would say choose Medit as your next scanner; you won’t be disappointed. The i500’s wand is very easy to use, the scanner is light weight, allows for easy cleaning and maintenance, is highly portable, and works like a plug-and-play machine. The Medit i500 is really making everyone’s life simple and efficient.

Medit is thankful to Dr. Vas Srinivasan for talking to us and supporting the successful validation of the Medit i500 for the Spark clear aligner workflow free of charge. If you would like to find out more about him and his clinic you can visit the website Invisible Orthodontics. Dr. Vas is the largest Spark provider globally, with the aligners being currently available in Australia, New Zealand, China, Spain, Canada and the United States.

More related articles on Medit blog

[/column_1]

[/column]

New iScan Functions: A.I. Abutment and Scanbody Matching

[column parallax_bg=”disabled” parallax_bg_inertia=”-0.2″ extend=”disabled” background_color=”” background_image=”” background_repeat=”” background_position=”” background_size=”auto” background_attachment=”” hide_bg_lowres=”” background_video=”” extended_padding=”” vertical_padding_top=”0″ vertical_padding_bottom=”0″ horizontal_padding=”0″ more_link=”” more_text=”” left_border=”transparent” class=”” id=”” title=”” title_type=”single” animation=”none” width=”1/1″ last=”true”]

[column_1 width=”1/1″ last=”true” title=”” title_type=”single” animation=”none” implicit=”true”]

AI-Matching

Today, we’re introducing yet another popular feature in iScan V1.3 – the A.I. Abutment and Scanbody Matching function. We’ve received many enquiries about how this function works so read on to find out how it can ease your work!

What exactly is the A.I. Abutment and Scanbody Matching feature? To put it simply, this feature allows users to register data to the abutment or scanbody library so that the library data can be matched to the scan data during the scanning process. This simplifies the workflow by automatically aligning the selected library data with the abutment or scanbody you are scanning so that you don’t need to scan it fully to get a complete result.

AI Matching - 1

Besides cutting down the scan time, this feature comes in especially handy in instances where it is difficult to scan an abutment due to diffuse reflection or when the intraoral space is particularly narrow and deep. This feature also eases the workflow as the library scan data can be sent to partners for further processing such as for use in the design of prostheses.

So how does this function work exactly?

AI Matching - 2

For both abutments and scanbodies, you will first need to create a case in Medit Link, making sure to fill in the form information so as to activate the A.I. Abutment/Scanbody Matching Feature. Then, scan the case in the iScan software before placing the abutment or scanbody. Once you’ve selected the corresponding library data, the selected abutment/scanbody will appear on the screen and when you scan the abutment/scanbody, the library data will automatically sync with the scan data.

AI Matching - 3

In cases where the data is unable to be synced accurately, you can always use marker points to manually adjust the data. Once you’re satisfied with the results, you can save the case! The aligned abutment/scanbody library data will be saved to the Case Detail which can be sent to the lab when placing an order. And you’re set. It is that simple!

If you still need a guided step-by-step tutorial for this function, check out the help centre articles on the A.I. Abutment Matching feature or the A.I. Scanbody Matching feature.

You can also find out what else is new in Medit Link V2.1 and iScan V1.3 , watch tutorial videos of the new features in our Medit Academy Youtube channel, and check out the help guides for all the new features for both clinic users and lab users at the Medit Help Centre.

More related articles on Medit blog

[/column_1]

[/column]

The Battle of File Formats: STL vs OBJ vs PLY

[column width=”1/1″ last=”true” title=”” title_type=”single” animation=”none” implicit=”true”]

battle-black-blur-260024Humans have been storing information ever since writing was first developed. Before the invention of 3D scanning, dentists and lab technicians would store physical models and paper files in cabinets. However, information storage is now in a digital stage so rather than cabinets, we use computers. File formats are used to encode information to store data on a computer and programs need to recognize and access the file format in order to use the data.

With regard to impressions, the most basic feature of files formats is that they encode a 3D model’s geometry. There are three ways to do so: approximate mesh, precise mesh, and constructive solid geometry (CSG).

For 3D printing, approximate mesh is used because printers are unable to print in too high a resolution and the other ways to encode geometry are unnecessary for 3D printing. Approximate mesh uses tessellation which is the process of tiling a surface of an object with geometric shapes. The tiling produces no overlaps or gaps. With this process, it is possible to store the appearance of the model and other details such as color or texture. In 3D printing, the file is usually generated by CAD, which is then later processed by CAM, creating the CAD/CAM system.

So, this brings us to the three file formats commonly used in 3D printing: STL, OBJ, and PLY.

The most common file format that uses approximate mesh – and for 3D printing in general – is the STL file. In STL files, the tiles used are triangles (called facets), which cover the surface of the 2D shape. There are several advantages to using STL over other file formats. First, as it is universally recognized and most commonly used, collaboration is made easier. STL files are also simple and small, which makes processing them faster.

However, STL files have a large downfall. As tessellation only covers the surface, the files encode for surface geometry with no representation of color or texture. If you only want a single color or texture – which is most often the case – then STL files are great but with improved printers and the demand for color, other formats are increasing in popularity. Another issue with STL files is resolution. Retaining high resolution or encoding larger-sized objects requires more triangles, resulting in larger file sizes. The larger the file size, the longer it takes to process them.

The next two file formats, OBJ and PLY, were created to make up for what STL files lack. Both can store properties such as color and texture. While not as widespread as STL files, both OBJ and PLY are well-known and widely used for their ability to store color and texture along with other details. Both files benefit from improved 3D printers and are viewed as having more relevance into the future than STL files.

In the end, is one file format better than the other? It mainly depends on your needs and situation. However, one thing is for sure – 3D printers will continue to improve and so will file formats.

[/column]

5 Things to Note Before Purchasing a 3D Dental Scanner

[column width=”1/1″ last=”true” title=”” title_type=”single” animation=”none” implicit=”true”]

DentalScanner-AZ copy-1-2

You may have read all the rave reviews about how going digital is going to be the best decision for your clinic and you may be thinking about purchasing your first 3D dental scanner. But do you know what you’re actually signing up for? Here are five things you should note before making the switch.


1. Check for hidden costs!

It may be tempting to base your purchasing decision on the cost of the scanner alone but do you know the actual cost of operating the scanner? For example, some companies may require you to pay annual subscription fees which add to the total cost of using their scanners, especially over a long period of time. This is especially if the cost of entry is high to begin with. So we suggest having a budget in mind and comparing scanners within your budget – taking into consideration all costs (hidden or explicit) – in order to make an informed decision.

2. Think long-term.

Your 3D dental scanner should serve you for a long time so you’ll want to purchase one which will be able to perform tasks not just for your current work but your future work. Think about the future of your clinic or lab and decide on a scanner which will be able to either be upgraded in future (with add-ons, for example) to serve those needs or which can already perform those tasks.

3. Do your own comparison.

While you should definitely ask around for recommendations, remember that you are getting a scanner to suit your own needs. A scanner which works well for someone else may not be the most suitable one for you if you specialize in a different field. Get recommendations to better understand which scanners seem to work best for certain tasks and narrow down your choices. You might also want to check out our tips on choosing the right scanner for your own needs here.

4. Try it before you buy it.

Where possible, you should always try a scanner before buying one. You can attend exhibitions or request for a live demo if the company offers that. After all, your scanner is a long-term investment so you’ll want to purchase something which you are comfortable with.

5. Be prepared for workflow changes.

Change is never easy. That’s why you need to be prepared to invest some time to change your workflow processes when going digital. While it may seem like a daunting task at first, it will be worth it. Just think about the time you’ll save in the long-term because of the increased productivity and efficiency!

Purchasing a 3D dental scanner is a huge investment so you’ll want to make sure you’ve considered all your options before deciding on your purchase. Remember that any device is only useful to you if it serves your needs. Avoid making a hasty decision to ensure your investment will truly pay off in the long-run.

[/column]

Is a Fully-Integrated Digital Dental Practice the Right Solution for You?

[column width=”1/1″ last=”true” title=”” title_type=”single” animation=”none” implicit=”true”]

shutterstock_551063581 (1)

Are you considering integrating milling facilities into your dental practice? While it may be tempting to transform your dental practice into a one-stop solution for your patients, this approach may not be the best option. In addition to the high investment costs to bring a lab in-house, you will also need to consider the time taken to implement the new technology, including training your staff members on new work processes or hiring new staff. Is your dental practice ready for the change? We share some of the advantages and disadvantages of having an in-house lab so that you can decide whether a fully-integrated dental practice is the right solution for you now.

Let’s begin with the advantages. Why should you consider having an in-house lab in your dental practice?

  1. Quick Turnaround Times

Firstly, having your lab in-house means that your patients can receive their permanent restorations within the same day. This means that you can save your patients the inconvenience of making a second appointment just to receive their permanent restoration as the lab can quickly and efficiently make any adjustments or modifications required for the restoration. In addition, having an in-house lab ensures that high-priority cases can be treated quickly.

  1. Quality Control

Bringing the lab in-house would allow dentists to have better control of the treatment from beginning to end. This ensures the quality of both the dental service as well as the finished product by the lab. Lab technicians will also be able to provide customized services (such as making sure that the restoration matches the patient’s teeth color for more natural results for eg.) as they can assess the patient’s needs together with the dentist during the initial appointment. By working together with the dentist from the start, the lab will minimize the risk of errors or mistakes, saving both the lab and clinic time and money.

  1. Convenience

Working with external labs may require multiple trips to the lab for adjustments to the final product. In addition, patients may be required to wear a temporary restoration while waiting for the final restoration to be completed. By bringing the lab in-house, patients not only receive their permanent restoration within the same appointment, but the clinic and lab need not waste time going back and forth to make sure the permanent restoration fits perfectly. Changes to shape, color and fit, can be made on-site if needed.

Now that we’ve discussed the advantages bringing the lab in-house, here are some considerations that you may want to look at before deciding whether or not to integrate milling facilities in your practice.

  1. High Initial Investment

The initial cost to implement an in-house lab is high. In addition to purchasing equipment and software, the clinic will need to invest time in training and allow for an adjustment period for all the staff involved, old and new. This may not make economic sense for a small practice as the clinic may not acquire enough cases to make the investment worth the money.

  1.   Choosing a Specialization

If you’re considering implementing an in-house laboratory, you will need to decide on the lab’s specialization. Unfortunately, it is impossible for an in-house lab to take on all kinds of cases which is why clinics tend to work with different labs for different types of cases. What this also means is that even with an in-house lab, the clinic will still need to send out certain cases to another lab if it doesn’t fall within its expertise. An important question to ask yourself before bringing your lab in-house is – “Does this fall within my area of expertise?” If lab work is not aligned to your clinic’s core competencies, your clinic may end up spending more time and resources on the lab and neglecting clinical work, which is and should continue to be your main service.

  1.    Issue of Profitability

Standalone laboratories are able to offer competitive prices due to the large economies of scale. This may dissuade patients from seeking treatment at the clinic if the clinic is unable to offer comparable pricing despite the convenience of having a one-stop solution. This may result in lower profits despite cost-savings from bringing some services in-house.

While the convenience of an in-house lab may be a tempting idea, there are other ways of improving your workflow with labs that do not require integrating milling facilities into your practice. For example, you can look at communications systems which allow you to communicate effectively and efficiently with labs, such as Medit Link. In addition, by using open digital systems, you will also have greater flexibility in working with various labs which specialize in different things. Remember that there is no one-size fits all solution, so you should definitely weigh your options before making a decision with regard to your dental practice!

[/column]

How to best make the transition to digital dentistry (clinic-side)

[column width=”1/1″ last=”true” title=”” title_type=”single” animation=”none” implicit=”true”]

whiteboard_digital_dentistry2

What is digital dentistry?

Digital dentistry is just as it sounds: the mix of dentistry and the digital world through the advancements in dental technology. Today, the CAD/CAM system is carving its place in dental clinics and labs around the world. Scanners and CAD/CAM complement each other to make restorations for patients without the needs of old traditional models. CAD/CAM companies, such as exocad, are working together with scanner manufacturing companies to create a wonderful open system for dental professionals to improve their workflow. New literature is published each year, praising the new technology and convincing dentists and technicians to make the transition from traditional dentistry to digital dentistry.

So by now, you have accepted that the future of dentistry is to go digital. You have read about the success of new technology such as intraoral scanners, the benefits of making the switch, and are ready for your clinic or practice to go digital. But there is one final question you may be asking.

How do you best make the transition to digital dentistry?

Here is a step-by-step guide on how to enter into the digital world of dentistry and begin to reap the benefits of doing so. We break down the process into four stages of entryStart, Phase 1, Phase 2, and Phase 3.

Start

During the first stage, you are currently not using CAD/CAM in your clinic. This is beginning of your journey into the digital realm; the information and planning stage. You must decide what systems would work best for you, your budget, and in which direction you want to take your clinic.

Phase 1

It is now time for you to move on to phase 1. Before making an intra-oral scanner purchase, you should first find a lab that uses CAD/CAM. The lab will become your partner through the digital experience and will be able to provide you with great insight about the system. They will also be able to help you discover which brands may be best for you and your collaboration.

Phase 2

Phase 2 is the one you may have been waiting for; it is time to purchase an intra-oral scanner and incorporate the digital workflow into your clinic. During this phase, you start sending digital cases to your partners at the lab and begin strengthening the partnership between you.

Phase 3

Now that you have your own equipment, are working closely with a lab, and are more used to how digital dentistry works, you can move on to phase 3. In this final phase, you begin integrating chair-side CAD/CAM solutions and head toward one-day dentistry to save time and increase the number of patients you can see.

By following these four simple steps, your transition to digital dentistry should be smooth and without hiccups. Enjoy the digital workflow and your new and improved clinic!

Medit will soon be launching its very own intraoral scanner, the Medit i500! If you are interested in learning more about the latest product, click here. If you enjoyed our blog, please read our other posts about digital dentistry!

[/column]